
You're sitting down to work, poised to type an urgent email, finish a vital project, or just browse the web, and suddenly... nothing. Your laptop's keyboard stops responding. Perhaps it's just a few keys, or maybe the entire keyboard is completely dead. The panic is immediate. Your powerful, portable laptop, your connection to the world, is suddenly just an expensive, silent brick.
This is, without a doubt, one of the most common and frustrating hardware issues we encounter. As a leading retailer and service provider for premium electronics, Computer Village has diagnosed and resolved countless keyboard problems. We've seen everything from a simple driver conflict that took 30 seconds to fix, to a catastrophic spill that required a full motherboard and keyboard replacement.
YMYL & EEAT Consideration: This topic squarely falls under the "Your Money or Your Life" (YMYL) category. Why? Because your laptop is a high-value, essential device for your work, school, and personal life. Attempting an improper fix—like prying off keys the wrong way, using the wrong cleaning solution, or opening the device without proper grounding—can lead to you permanently damaging the delicate keyboard mechanism or, far worse, short-circuiting the laptop's motherboard. This guide is built from our extensive technical expertise to help you safely diagnose the problem. We will be clear about which fixes are safe for you to try and when you absolutely need to stop and seek professional help from our IT Services team.
This comprehensive guide will walk you through:
Section 1: The Three Main Causes: Software, Hardware, or Physical Damage
Section 2: Safe Software Troubleshooting (The "Free" Fixes)
Section 3: Cautious Physical Cleaning & Inspection (The "DIY" Fixes)
Section 4: When to Stop: The Red Flags That Mean You Need a Professional Repair
FAQs: Your most common laptop keyboard questions, answered by our experts.
Let's get those keys working again.
Section 1: [Topic Overview] Why Did My Laptop Keyboard Stop Working?
When a laptop keyboard fails, the problem almost always falls into one of three categories. Identifying the category is the most important step, as it dictates whether you have a free 5-minute fix or a serious hardware issue on your hands.
Category 1: Software & Driver Conflicts (The "Confused" Laptop)
This is the best-case scenario. It means the physical keyboard hardware is perfectly fine, but the software that acts as the "translator" between your fingers and the computer's brain is confused, corrupted, or out of date.
Driver Failure: Your keyboard communicates with your operating system (Windows, macOS, etc.) through a small, essential piece of software called a "driver." If this driver is corrupted by a recent system update, a new app installation, or just random data rot, the connection is lost. The OS literally doesn't know how to listen to the keyboard.
Accessibility Settings: This is a surprisingly common culprit. Features like "Filter Keys" or "Sticky Keys" in Windows, or "Slow Keys" in macOS, are designed to help users with motor challenges. If enabled by accident (often via a complex shortcut), they can make it seem like your keyboard is broken or lagging severely. For example, "Filter Keys" is designed to ignore brief or repeated keystrokes, which to a normal user feels like the keyboard is unresponsive.
Malware: Though less common on modern, updated systems, certain viruses or malware can be designed to disable input devices like your keyboard or trackpad to lock you out of your system.
Simple OS Glitch: Sometimes, the operating system just gets "stuck." A background process may have crashed and taken the input driver with it. This is usually temporary and requires no complex fix.
Category 2: Physical Blockage or Wear (The "Dirty" Laptop)
This is a physical, but often fixable, hardware problem. It usually affects individual keys or small sections of the keyboard, rather than the entire thing.
Debris Under Keys: This is the #1 culprit for individual key failure. Dust, crumbs, pet hair, and other tiny particles get trapped under the keycaps. They build up over time and create a physical barrier, preventing the key from being fully depressed or stopping the internal sensor from making a clean contact.
Sticky Residue: A minor spill of a sugary drink (coffee, soda) from months ago can leave a sticky residue. It might not have been enough to short out the keyboard, but it makes the keys stick, feel "mushy," or fail to register a press because the keycap can't rebound properly.
Worn-Out Contacts: If you're a heavy typer or a dedicated gamer, you can simply wear out your most-used keys (like 'W', 'A', 'S', 'D', 'E', 'C', or the spacebar). The physical contact points under the keycap have a finite number of presses and can eventually fail, just like any other mechanical part.
Category 3: Hardware Damage (The "Broken" Laptop)
This is the most serious category, where the physical components are damaged, disconnected, or short-circuited. These issues almost always require professional repair.
The Ribbon Cable: Your keyboard doesn't have a simple USB plug inside. It connects to the laptop's main motherboard via a single, very thin, wide, and fragile flat "ribbon cable."
Dislodged: A hard drop, a jolt, or even the vibration from travel can, over time, knock this cable loose from its tiny connector. This will kill the entire keyboard at once.
Damaged: If you've had a previous repair (like a battery replacement) done by an inexperienced technician, this delicate cable can be torn, creased, or not latched correctly.
Liquid Spill: This is the keyboard killer. Even a small amount of liquid (water, coffee, wine, tea) can seep under the keys and get onto the keyboard's electronic membrane or, far worse, onto the laptop's motherboard, which often sits directly beneath it. This causes short circuits and corrosion that can kill the keyboard instantly or slowly over days and weeks as the corrosion spreads.
Failed Keyboard Controller: This is a more complex issue. A specific microchip on the motherboard itself, which manages the keyboard, can fail due to a power surge, overheating, or the aforementioned liquid damage. If this chip fails, the entire keyboard (and often the trackpad) will die. In this case, a simple keyboard replacement won't fix it; the motherboard itself needs component-level repair.
Section 2: [Key Points] The Software Troubleshooting Checklist (Try These First!)
Always rule out the free and easy software fixes before you even think about touching the hardware. This is the exact diagnostic process our own technicians start with.
YMYL Disclaimer: These software steps are 100% safe. They involve changing settings, restarting, and updating software. You cannot damage your laptop by performing these steps.
Step 1: The "Golden Rule" - Restart Your Computer
This is not a joke. It is the most effective fix for temporary software glitches. A restart forces the OS to reload all its drivers from scratch and clears any "stuck" processes that might be hogging the input service.
Pro Tip: Choose "Restart" from the power menu. Do not just "Shut Down" and turn it back on. In Windows, a feature called "Fast Startup" (which is on by default) means "Shut Down" actually performs a type of hibernation, and it may not fully clear the driver-level problem. "Restart" always forces a complete, fresh boot.
Step 2: Check Accessibility Settings
You might have enabled a feature by accident.
On Windows: Go to Settings > Accessibility > Keyboard. Scrutinize this page. Make sure "Sticky Keys," "Filter Keys," and "Toggle Keys" are all OFF. "Filter Keys" is the most common culprit, as it's designed to ignore brief or repeated keystrokes.
On macOS: Go to System Settings > Accessibility > Keyboard. Make sure "Slow Keys" is OFF. If this is on, you have to hold a key for a long time for it to register, which feels like it's broken.
Step 3: Update or Reinstall Your Keyboard Driver (The "Windows Fix")
This is the next most likely software fix on a Windows laptop.
Click the Start button and type "Device Manager." Open it.
In the Device Manager window, find and expand the "Keyboards" section.
You will see one or more keyboards listed (e.g., "Standard PS/2 Keyboard" or "HID Keyboard Device").
Right-click on your keyboard and select "Update driver." Choose "Search automatically for drivers." Windows will check for a better driver.
If that doesn't work (it often doesn't), right-click again and select "Uninstall device."
Don't panic! This is safe. A box will pop up asking you to confirm. Click "Uninstall." Your keyboard will immediately stop working.
Now, simply Restart your computer (you'll have to use your mouse/trackpad to do this).
As Windows boots up, it will automatically detect the "new" hardware and reinstall a fresh, uncorrupted driver. This single process fixes the majority of driver-related keyboard failures.
Step 4: Try an External Keyboard
This is a critical diagnostic step. Plug in any standard USB keyboard.
If the external keyboard works perfectly: The problem is 100% related to your laptop's internal keyboard hardware (Category 2 or 3). You can stop troubleshooting software.
If the external keyboard also doesn't work (or acts weirdly): You have a deeper software, OS, or motherboard issue (Category 1 or a rare part of 3). This could also point to a USB port failure, so try a different port.
Step 5: Check for Software Updates & Malware
Updates: Go to Settings > Windows Update (or System Settings > General > Software Update on Mac). Run all available updates. Sometimes a recent buggy update broke the driver, and the next update is specifically designed to fix it.
Malware: Run a full, deep system scan with your preferred antivirus software (e.g., Windows Defender, Malwarebytes) to ensure no malicious program is interfering with your input devices.
Section 3: [Practical Advice] Cautious Physical Cleaning
If software fixes failed and an external keyboard does work, the problem is your laptop's keyboard. The next step is a safe, cautious cleaning. This is aimed at fixing "Category 2" problems.
YMYL / EEAT DISCLAIMER: Proceed with extreme caution. Laptop keys are incredibly delicate. They are held on by tiny, fragile plastic clips. Breaking one of these clips can mean the keycap never goes back on properly. Never spray any liquid directly onto your keyboard.
Method 1: The Invert-and-Tap (For Loose Debris)
Shut down your laptop completely. Unplug it from the charger and any other accessories.
Open the laptop to a 180-degree flat position, or as far as it will go.
Hold it upside down over a clear surface or trash bin.
While holding it securely, gently tap on the bottom of the laptop's base. Do not shake it violently. The goal is to let gravity dislodge any loose crumbs or dust from under the keys. You may be surprised what falls out.
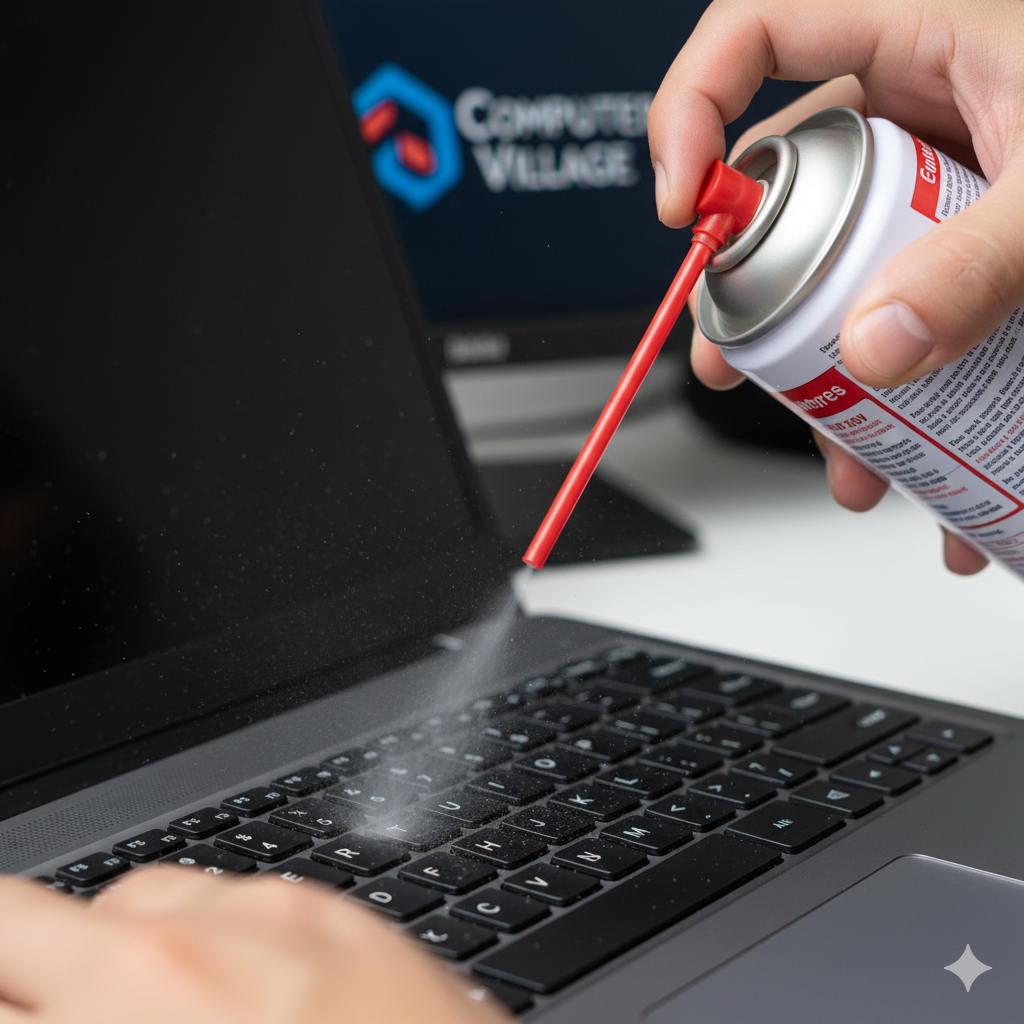
Method 2: Compressed Air (The Right Way)
Get the Right Tool: Use a can of "compressed air" or "canned duster" designed for electronics. Do not use a vacuum cleaner (can create static) or an air compressor (too powerful).
Use the Straw: Attach the thin plastic straw to the nozzle. This is essential for directing the air.
Hold at an Angle: Never spray directly down into the keys. This just pushes the debris deeper in. Hold the laptop at a 75-degree angle (or on its side).
Use Short Bursts: Fire short bursts of air (1-2 seconds) across the keyboard, not into it. Work your way from one side to the other, from top to bottom. The goal is to blow the debris out from under the keys.
Important: Cans of compressed air get very cold and can spray liquid propellant if held at the wrong angle. Keep the can as upright as possible and fire a few test bursts away from the laptop first.
Method 3: Wiping Sticky Keys (Use With Extreme Caution)
This is for minor, sticky residue from a small splash, not a full-on spill.
Shut down the laptop and unplug it.
Get the Right Tool: A clean, lint-free microfiber cloth and a small amount of 90-99% Isopropyl Alcohol. Do not use rubbing alcohol (which is 70% water), Windex, water, or any other household cleaners.
Apply to Cloth, Not Laptop: Dampen a small corner of the cloth with the alcohol. It should be damp, not dripping wet.
Wipe Down: With the laptop off, gently scrub the tops of the keys and the spaces between them. For a particularly sticky key, you can press it down and gently wipe around the edges. The high-percentage alcohol will dissolve the stickiness and evaporate almost instantly, minimizing the risk of liquid damage.
What About Prying Off Keycaps?
We do not recommend this. On modern laptops, especially premium thin models like a MacBook Air M2 or MacBook Pro, the "butterfly" or "scissor" mechanisms underneath are incredibly fragile and complex. Prying off a keycap to clean it has a very high chance of breaking the tiny plastic clips. If that happens, the keycap never goes back on properly. This is a job for a professional.
Section 4: [Conclusion] When to Stop: The Red Flags for Professional Repair
The golden rule of DIY is to know your limits. Your laptop is a complex, expensive, and delicate machine. If the simple fixes in Sections 2 and 3 don't work, you've reached the point where you are far more likely to cause more damage.
It is time to stop and call a professional when you see these red flags.
Red Flag 1: The Keyboard Is Dead After a Spill. STOP. Do not even turn it on. A liquid spill is an emergency. Unplug it immediately. If you have an older model with a removable battery, take it out. Hold the laptop upside down to let any liquid drain out. Do not put it in rice (this is a persistent myth and just gets rice dust in the ports). It needs to be professionally disassembled and cleaned by our IT Services team immediately to prevent corrosion on the motherboard. Time is your enemy here.
Red Flag 2: Multiple, Random Keys Are Not Working. This is almost never a "dirt" problem. If keys in different parts of the keyboard (e.g., 'T', 'G', and 'L') all fail at once, it's a classic sign of a failing keyboard membrane or a damaged trace on the circuit board. Cleaning will not fix it. The keyboard assembly itself is failing.
Red Flag 3: The Entire Keyboard Is Dead. If the whole keyboard is unresponsive (but an external one works) and the driver reinstall did nothing, the internal ribbon cable is the primary suspect. It's either disconnected or damaged. The laptop must be completely opened to inspect and re-seat or replace this cable, a delicate operation that often requires removing the motherboard.
Red Flag 4: Keys Are "Mushy," Sticking, or Physically Broken. If keys are physically broken, missing, or feel "crunchy" or "mushy" after a spill, the cleaning methods above won't be enough. The keyboard needs service. We can often replace individual keycaps on some models, but a full spill usually requires a top-case/keyboard replacement.
Red Flag 5: The Keyboard and Trackpad Failed at the Same Time. This is a major red flag. On many laptops (especially MacBooks), these two components share a controller or a related cable. This often points to a failed ribbon cable, a bad motherboard controller, or a swelling battery (which can push up from underneath, warping and damaging the trackpad and keyboard).
Your Professional Solution at Computer Village
When you've hit one of these red flags, it's time to let us take over. Attempting to "fix" a Category 3 problem yourself is how a $100 repair bill turns into a $1000 dead laptop.
Expert Diagnosis: We can quickly and definitively determine if the problem is a simple driver, a loose cable, or a liquid-damaged motherboard.
The Right Parts: We have access to the exact, high-quality replacement keyboards and parts for your specific model, from an iPad 10th Gen cover to a full MacBook Pro top case.
Risk-Free Repair: Our trained technicians perform these delicate repairs every day. We have the anti-static tools, microscopes, and expertise to safely open your device and perform the repair without risk.
Comprehensive Service: While it's with us, we can solve other issues, from a battery replacement to a full system tune-up. Check out our Top Deals for other services and products.
Don't let a faulty keyboard end your laptop's life. Contact Computer Village today for a repair quote.
FAQs (Frequently Asked Questions)
Q1: How much does it cost to replace a laptop keyboard? A1: The cost varies dramatically, and this is why diagnosis is key. On some older or business-model laptops, the keyboard is a simple, separate part that's easy to swap for a relatively low price. However, on most modern ultrabooks (like a MacBook Air M2 or a Dell XPS), the entire keyboard is riveted into the "top case" (the whole aluminum piece your hands rest on). This is a much more complex, labor-intensive, and expensive repair. We must identify your exact model to give an accurate quote.
Q2: My keyboard is typing the wrong characters (e.g., I press 'J' and get '1'). What's wrong? A2: This is almost always a software issue! You have likely enabled "NumLock" (Number Lock). On many laptops without a dedicated number pad, a "NumLock" function turns a section of your letter keys (like U, I, O, J, K, L) into a virtual number pad. Look for a key labeled "NumLk" or "Num" or an icon of a keypad, often on a function key (F1-F12). Press this key, or press it in combination with the "Fn" key, to turn it off.
Q3: Can I replace just one broken keycap? A3: Sometimes. If the keycap itself is broken but the delicate scissor switch underneath is intact, we can often source and replace just the cap. If the underlying switch (the plastic mechanism) is broken or missing, it's much more difficult. On some models, this is possible; on most modern MacBooks, it is not, and the entire top case needs to be replaced.
Q4: Will a Windows or macOS update fix my keyboard? A4: It's possible, but not likely unless it's a very widespread, known bug. If the issue was caused by a recent buggy update, the next update may contain a fix. However, it's more common that an update causes a driver conflict. Following Step 3 (reinstalling the driver) is a more direct and faster fix than waiting for another update.
Q5: Besides laptops, do you service keyboards for other devices? A5: Yes! We are a full-service electronics center. We can service the Smart Keyboard for an iPad Pro 12.9", help with sticky buttons on an Apple TV remote, and even diagnose issues with the Digital Crown on an Apple Watch Series 9 or Apple Watch Ultra 2. Our IT Services cover the full spectrum of personal and business electronics.
Disclaimers (for YMYL Topics)
The information in this article is for educational and informational purposes only and is based on our team's professional experience. Attempting DIY repairs on a laptop carries significant risks, including but not limited to, voiding your warranty, data loss, electrostatic discharge (ESD) damage, and causing permanent damage to sensitive components like the motherboard or keyboard ribbon cables. Never attempt to disassemble your laptop to "fix" a keyboard unless you are a trained professional with the proper anti-static equipment. Computer Village is not liable for any damage you may cause by following the DIY steps in this guide. For a safe, professional, and guaranteed repair, please contact us.